Photoshop CS4 texture tutorials...

I’m at a loss here, does anyone know of any good beginner tutorials to create (from scratch) things like floor tiles and hallway tiles?

I can find a shitload of tutorials aimed at advanced users, photographers and even for beginners, but not a single one teaches you how to make simple tilesets for games.

What I’m looking for is a tutorial aimed at beginners (n00bs) on how to make basic textures from scratch. Things like a tile floor or basic hallway textures, intended for use in games, not retouching photos or anything.

Does anyone know any good tutorials like this?

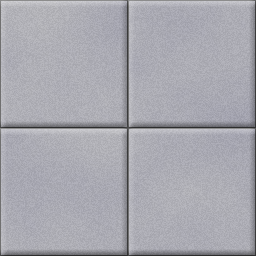
EDIT: What I’m looking for is a tutorial that teaches me to make a texture like the floor tiles and walls from scratch, but obviously better quality than this:

Photographs are the only answer if you want a decent texture.

That’s not true at all.
The only “trick” I know to painting textures is to use Filter>Other>Offset in Photoshop.

  1. Paint a single tile to look like what you want.
  2. Offset the entire image by half of the image width.
  3. Paint over the seams so you can’t see where it repeats.
  4. Offset again, with the opposite value (so it’s back to the original coordinates).
  5. Paint over any seams that have reappeared.
  6. Profit.

edit - I remembered a good metallic texture mapping tutorial - may or may not be useful to you

https://forums.cgsociety.org/showthread.php?t=373024

It’s suprisingly easy, within a week I was pumping out my own Photoshopped tileable textures using photos as a base.

I suggest you register an account on https://www.CGtextures.com so you can download up to 15mb of textures a day (more than enough). You pick something you like then you Photoshop it the way you want it (color corrections or put decals on it) then you must get rid of the seams so the texture tiles properly.

Making it tileable is the tricky part but once you get the hang of it it’s easy. Here’s a tutorial:

https://www.shareaec.com/v/1395/Text-Entry-Tutorial/How-to-make-a-tileable-texture-in-Photoshop

In the tutorial above i’d like to note however that in step 3 you should not use offset 500, instead use half the amount of pixels your image is using. For example if your texture is 512x512 then set the offset to 256, now remove all the seams as explained in the tutorial and switch it back to normal by doing an offset of 256 again.

I suggest you start with something easy like a plane concrete wall then make it tileable, use the Photoshop normal map filter for creating a normal map (Google for tutorials).

edit:

Here’s an easy one to start with, grab a chunk out of it and resize it to 512x512 (common size for a texture that is applied to brushes) and work with it from there.

  1. Create a new image, 256x256
  2. Select a light grey foreground colour (around 192, 192, 192)
  3. Select a slightly darker grey background colour (158, 158, 172 for a hint of blue to it)
  4. From the menu, select Filter -> Render -> Clouds. Press Ctrl + F to repeat this until you find one that’s evenly spread.
  5. From the menu, select Filter -> Noise -> Add Noise… 3% should be enough, Uniform and Monochromatic.
  6. From the menu, select Edit -> Preferences -> Guides, Grids and Slices. Under Grid, choose 128 pixels and 1 subdivision. Click OK.
  7. Press Ctrl and ’ to turn the grid on.
  8. With the Rectangular Marquee Tool (M shortcut) select the top-left quarter of the image, then whilst holding down Shift, select the bottom-right quarter. Press Ctrl + X to cut.
  9. From the menu, select Layer -> New -> Layer… OK the default values. Press Ctrl + V to paste the selection onto the new layer.
  10. From the menu, select Layer -> Layer Style -> Bevel and Emboss… Change the depth to 40% and the Size to 7px.
  11. From the Blending Options, also select Stroke. Change the size to 1px, the position to Inside, and pick a dark grey colour (80, 80, 80 or something). OK that.
  12. From the menu, select Layer -> Layer Style -> Copy Layer Style. Select whichever layer you didn’t apply the styles to, and choose Layer -> Layer Style -> Paste Layer Style from the menu.
  13. Press Ctrl + ’ again to remove the gridlines, and you should have a floor tile texture (good enough for beginners anyway)

Here’s mine:

Thanks, I’ll give it a try :slight_smile:

Cool, let us know how you get on. That was my first ever tutorial and I made it just for you!

Rofl. That’s not even close to true. Do you really think that all the textures from things like Bioshock, AvP, even the Avatar movie are made from photos? Ahahahaa. If you had any idea of what you were talking about, you’d know that there are very clever people out there that can create all sorts of things that look awesome and realistic without using a photo at all. The closest photos usually come into it (if even at all) is for reference. Sometimes they have been used in textures to save time or if the guy is really lazy/hopeless and they have the budget to go find suitable things and get photos of them. But they are certainly not “the only answer if you want a decent texture” as you claimed. Try joining discussions that you actually know something about. I think I saw an Elmo topic around here somewhere you might enjoy…

You’re also very wrong Shasta, photos are very useful in texture mapping not only as reference but also as a base for different surface qualities that would be difficult to reproduce solely thru painting. Read the link I posted earlier in the thread if you want to learn more.

Re-read mine first. I already said that they have their uses. My point was that he was VERY wrong to say that “Photographs are the only answer if you want a decent texture”. Note him saying “the only answer” and me disputing that statement. Try to keep up.

Children, please…

I’m afraid you’ll have to wait for the results, I only just got Photoshop CS4 yesterday and I can’t even manage to colour a blank image :meh:

EDIT: Okay, I managed to make it work, though I can’t see a way to save it as anything else than PSD or TIFF and some other obscure file formats. The only thing Paint.NET reads is TIFF but it failed to read this TIFF, so I simply took a screenshot:

Any way to save these things as TGA or BMP or some other popular file format?

Haha oh dear. You can’t fill colour at all? What happens?

Yeah I managed to do it with a New Fill Layer, Solid Colour thingie, but I don’t know how to add background or foreground layers.

Strange, if I go to File -> Save As, I got loads of format options, gif, png, bmp, tga, tiff, jpg, blah blah…

I’m not quite sure what happened with your texture, the cloud colours are a bit too disparate, I can’t see any noticable noise, and the stroke doesn’t seem visible!

When I chose New File I set it to 512x512 (because I’m planning on texturing for the UE3 which uses 1024x1024 or even 2048x2048 ) and used RGB 32bit.

I’ve made a thread on the UDK forums to find out what the most used texture settings are, all I know is that they use TGA and at least 1024x1024 resolution.

Any reason why I can’t use 24bit? I can only set it to 1/8/16/32bit depending on colour mode.

While I don’t yet know all the UE3 texture settings, I’m sure it’ll have to be 1024x1024 in TGA format, so I’ll try and use these settings for now.

EDIT: when I chose 16bit RGB I get a few more options and when I chose 8bit I can save in TGA. However, I read that the UDK Content Manager doesn’t import 8bit RGB textures. It prefers 24bit TGA, so how do I make my texture a 24bit RGB TGA?

EDIT: I tried a new image with your settings but this time as 1024x1024 8bit RGB, and saved it as a 24bit TGA:

I don’t know how you get the cloud rendering so even, I’ve used Ctrl+F a hundred times and I never get it as evenly spread as you did :frowning:

I’d suggest you use a lighter dark grey, you want the difference between the greys as little as possible (whilst still visible, obviously). Also you might want to try selecting individual tiles, pressing Ctrl + T and then rotating individual tiles 90, 180 or 270 degrees to stop the clouds flowing straight across tiles.

Okay I did that, the result is indeed better :stuck_out_tongue:

Do you know how to add an alpha channel? I read that it’s just an 8bit greyscale layer, is this true?

Basically yeah. In the layers section in the bottom right there should be another tab called Channels. Go to there and create a new one. Do whatever you want to it, then click on the thumbnail of the channel whilst holding down Ctrl. This will select all the image data on there. Go back to layers and select the layer you want to apply the alpha channel to, and click the Mask icon (dark grey square with a light circle inside). That should apply the alpha mask to the layer.

This is where you’re wrong. Again, you might learn something about how textures are created if you read the link I posted. I’m not trying to flame you for being wrong, I’m trying to help you understand the process of creating a texture map for your own education.

Founded in 2004, Leakfree.org became one of the first online communities dedicated to Valve’s Source engine development. It is more famously known for the formation of Black Mesa: Source under the 'Leakfree Modification Team' handle in September 2004.