On A Rail Uncut - Re-Adding Cut Areas/Scenes (Expansion Project)

Imo not a problem, there are lots of explosive barrels in HL, BM, and HL2. Not all of them are positioned exactly next to an enemy.

I like this one. I was looking at the videos and found this one.

@Text; I think it’d be funny if you could find a way to imply that someone tried to call for help after the RC and weren’t able to reach it. That implication could be achieved by having another sign (alongwith the looping recording) next to the “Emergency Phone” sign that says:

[U]DIAL *91[/U] SECURITY MEDICAL HAZMAT FIRE
(The number *91 is from BM’s Security Jeeps, the location is the same as the “911” on US Police Vehicles, implying it’s the emergency number for Security and possibly other services).[/SIZE]

That pipe is an npc weapon from HL2, that’s probably why it makes weapon sounds. It’s used in Route Canal by a refugee to swat away Manhacks.

I think that happens when you get passed the trigger that makes enemies teleport in. Instead there just sit there invisible until you trigger them or attack it. If I’m right, telling which route you took might help fill in that gap.

Not necessary, there’s actually not much backtracking involved at all. The Security Office is actually very close to the train, and there’s a stairway that leads directly back to the room connected to the train. All that needs done is finding a way to draw players attention to that stairway, as I myself missed it on my first playthrough.

Have we discussed G-man sightings? I ask because I’m not sure if there were any in these parts of OAR. Or is that just not a priority at all?

It’s been discussed. There weren’t any, and there won’t be.

We talked about possibly adding a gman sighting on page 29 if you want to go look.
https://forums.blackmesasource.com/showthread.php?t=15754&page=29

I agree it doesn’t have to be set up perfectly for you to destroy an enemy, but even still this spot seems weird. Why would the H.E.C.U. set up a gun emplacement right next to an explosive barrel. It’s one thing for a group of houndeyes to be next to one or to have vortiguants teleport in near one, but this placement seems odd.

I like this idea. Something like this would be a nice little easter egg of sorts. Hopefully you could get the audio to really sound like it’s coming from a phone that’s hanging off the hook and not be too loud.

Oh alright makes sense.

Edited that post. I came from the office area.

Fair enough. I think that A2 has a bit too much freedom for paths taken to be honest. Normally I would never say that, but it does come off as very confusing. Once you play it a few times or if you’re designing it yourself it can be hard to remember what it’s like for a first time player. Some more directional cues could make it work.

The more time you take, the better - I am not exactly keen on replaying BM in the middle of my final year dissertation projects and work placement.

Woo first post in 2 days! :smiley:

I just wanted to make a couple suggestions, one I think deserves serious consideration and the other two just because I think they’d be interesting or cool. :stuck_out_tongue:

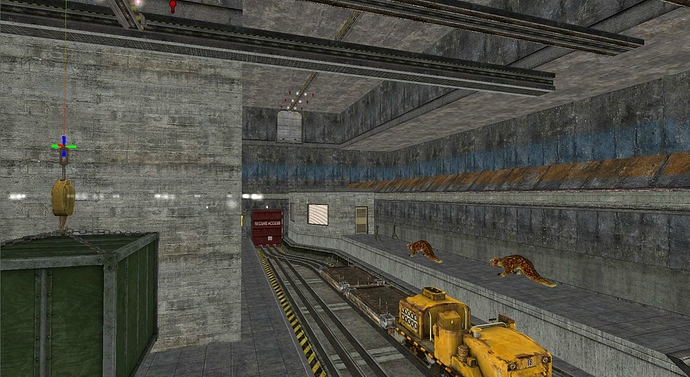
1A: For the serious suggestion, you should replace this Autocannon with an LAV-25. Functionally they’re almost identical, both are stationary (just have the LAV parked), slow, fire semi-rapidy, similar damage*. Plus, it’s on ground level, so there’s no need to explain how it got down there. For an excuse as to why an LAV is in such a small tunnel, you could have “DIE FREEMAN” or similar on one of the walls near it, to imply that the military knew you would come that way and actually assigned an LAV to hold you off.

  • 1B: On the other hand, the LAV is technically easier to destroy, but had requires more explosive power to do so. Perhaps if the Player opts to sprint by the APC instead, once he gets a decent distance from it, 3 Soldiers (representing the crewmen) spawn next to it and rush toward the Player’s position, the APC also becomes friendly to everything (to simulate being unmanned, incase the player backtracks to it).

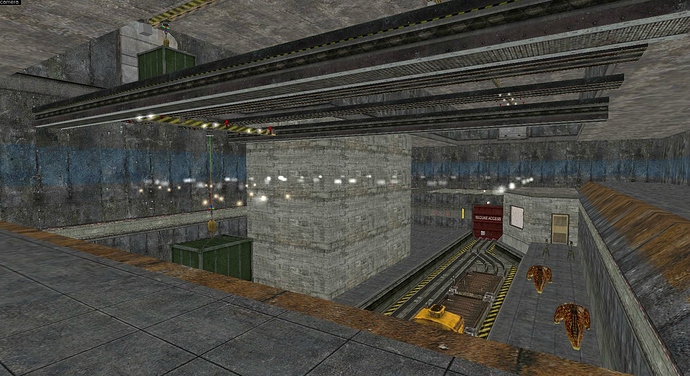
  • 2: If you include this crashed turntable elevator, would it be possible to make the tram drive off the edge and crash if not stopped by the Player?

  • 3: Would you ever consider adding an area between trams, where you get to through a maintenance area under grates, then come out below this elevator: Picture 1 | Picture 2

I had a much nicer post than written out, but my computer suddenly bluescreened :[ I think that’s everything though.

EDIT:
*They don’t have similar damage. I tested it, the Autocannon from Half-Life does 10 damage per hit. The LAV-25 does a (shockingly low) 1-3 damage per hit. Huh, I might never fear the LAV again…

Just wanted to say Text, that in playing these maps over and over, it really brings out the sheer brilliance in their concept and design. What’s even more astounding is how little time it took you to get these made and released. You should be extremely proud. Well done, sir. It’s made me focus even more on assisting you in maximizing their full potential.

Now back to the “spit n’ shine” part of the feedback process! I’ll “spit” n’ you “shine”. I’ve got to tell ya’, with all the “spittin’” I’m doin’, I’m gettin’ a serious case of dry mouth!

Continuation Of Feedback For OaR Uncut Alpha

  1. Consider having the four wires on the far wall https://i.imgur.com/lalojnz.jpg terminate at electrical boxes, at each end, as beautifully done here https://i.imgur.com/kE2yrm2.jpg. A shallower electrical box, depth wise, would be better. At the very least, place a bracket at the left end to match the right end, and to conceal the visual anomaly https://i.imgur.com/cncVBGF.jpg. The same here please https://i.imgur.com/VY9pmng.jpg
  2. Consider relocating this HECU body, as I don’t think the cot is heavy enough to support/hold his body in this position. Also, his back clips into the cot https://i.imgur.com/WCHGgKQ.jpg
  3. The damaged shelves in “Storage Room B” don’t provide any cover/protection from enemy fire. The player can shoot through them, as well. He/she can also clip through the portions that protrude into the aisles https://i.imgur.com/7M13d2M.jpg
  4. These counters have a gray trim on their top and bottom faces https://i.imgur.com/O2fK7Gj.jpg but these ones don’t https://i.imgur.com/otnE49c.jpg
  5. Can this odd appliance shadow be removed? https://i.imgur.com/8aITcjE.jpg
  6. Concerning the “Rail Security Override” office https://i.imgur.com/2qT3UB0.jpg none of the other offices have lights above their doors, within the office. Please consider the following:
    a) Relocate this light to above the window, to better illuminate the control panel and office corner https://i.imgur.com/WtQPGNh.jpg
    b) Relocate this light to above the window https://i.imgur.com/PpTzJrz.jpg
    c) Doing these changes ties in with the existing light above the middle window https://i.imgur.com/2mz1Mjy.jpg
  7. There should be a light on this tunnel wall, to match the one on the opposite side https://i.imgur.com/TgsuK0r.jpg
  8. Consider moving these handrail footings slightly to the left https://i.imgur.com/JtnqP7j.jpg
  9. Can this handrail joint be better aligned? https://i.imgur.com/XXQmT2I.jpg. Required on opposite railing as well.
  10. For a room this large https://i.imgur.com/C3bhLLL.jpg, consider adding another one or two fluorescent ceiling lights, and a light on this wall https://i.imgur.com/ZDlpXCY.jpg to match the ones on the other walls.
  11. Consider adding a light to this tunnel wall, close to its right edge, as there’s quite a distance to the previous one in the distance https://i.imgur.com/XQp46CW.jpg. The spacing between lights is thrown off in this area, because of the merging tunnels to the right. However, I think one is merited here. As an option, move the present one in the foreground, there. Ensure that the present light on the opposite wall https://i.imgur.com/66yCcaz.jpg is positioned directly across from it.
  12. I’ve located more incorrect footstep sounds (originally reported as item #90), where “sand/gravel-type” are heard instead of “concrete-type”. All occur when walking along the edge of a platform or sidewalk.
    a) At the start of map c2a2a1, past these electrical boxes https://i.imgur.com/JX1qqGn.jpg at the first vertical beam, here https://i.imgur.com/JE1yb3r.jpg for a short distance past it.
    b) From the first vertical beam to just before the first illuminated wall light https://i.imgur.com/cSQFnRO.jpg
    c) Across the tracks from instance 162(b), from this vertical beam to just before where the sidewalk edge ends https://i.imgur.com/HUZyL3q.jpg
    d) Just around this corner https://i.imgur.com/5WbCJfl.jpg from this vertical beam to the track lights https://i.imgur.com/iK1Ka8e.jpg
    e) Just beyond this bend up ahead https://i.imgur.com/WgEWyB2.jpg from this sidewalk angle change to just past the vertical beam https://i.imgur.com/I2T2gFi.jpg
    f) From just before this straight sidewalk, to the raised crosspiece https://i.imgur.com/IW15oeB.jpg
    g) Just beyond this area https://i.imgur.com/7QRaXiM.jpg, just beyond this vertical beam to the end of the sidewalk edge https://i.imgur.com/F5yM2ve.jpg
    h) Across the tracks from instance 162(g), It occurs on and off, from this vertical beam to almost all the way around the bend https://i.imgur.com/WQYPKsY.jpg
    i) Up ahead beyond this area https://i.imgur.com/a3Gxmdf.jpg along this straight section to just before the angle change https://i.imgur.com/U3FS8Oi.jpg
    j) Across the tracks from instance 162(i), from the seam at the change in width, to the end of the sidewalk https://i.imgur.com/sHlp6dQ.jpg
    k) Approaching the wall mounted trip mines, along this straight section https://i.imgur.com/uPPMkaU.jpg and again up ahead from just before this vertical beam until the angle change https://i.imgur.com/ZjxAwS0.jpg
    l) Across the tracks from instance 162(k), from the first trip mine, to just past the change in width seam https://i.imgur.com/aIMSnvK.jpg
    m) At this area https://i.imgur.com/XlxaMWK.jpg from this angle change to the next angle change https://i.imgur.com/BJMpJXg.jpg
  13. At the start of map c2a2a1, consider adding a light to this wall https://i.imgur.com/gxBly4m.jpg
  14. At the start of map c2a2a1, this military crate is clipping into the vertical beam’s base plate https://i.imgur.com/FZ72KN5.jpg
  15. A portion of the tunnel walls on either side of this area https://i.imgur.com/aBVhL8Q.jpg are missing the concrete curbs that run along their base, as shown here https://i.imgur.com/q2lPUVa.jpg and here https://i.imgur.com/U95PgWk.jpg. Also, there’s another instance just past this area https://i.imgur.com/EmHUacb.jpg depicted here https://i.imgur.com/Rjj3tGA.jpg
  16. This crate in the rocket engine room, is floating in mid air https://i.imgur.com/Q5gJO8t.jpg. If nudged, it falls to the ground.
  17. Remove this shadow anomaly on the floor next to this console https://i.imgur.com/nmPkPQI.jpg
  18. Consider removing this air vent (1 of 4) in the rocket engine room. It’s obscured and not needed https://i.imgur.com/fk2Lg3V.jpg
  19. All three of these blue garbage containers are in perfect positions https://i.imgur.com/FO6TqlI.jpg. Place them at different angles and vary the space between them.
  20. I suggest removing this wall vent https://i.imgur.com/VzBjJHO.jpg as it’s not needed. There are four wall vents on the opposite wall.
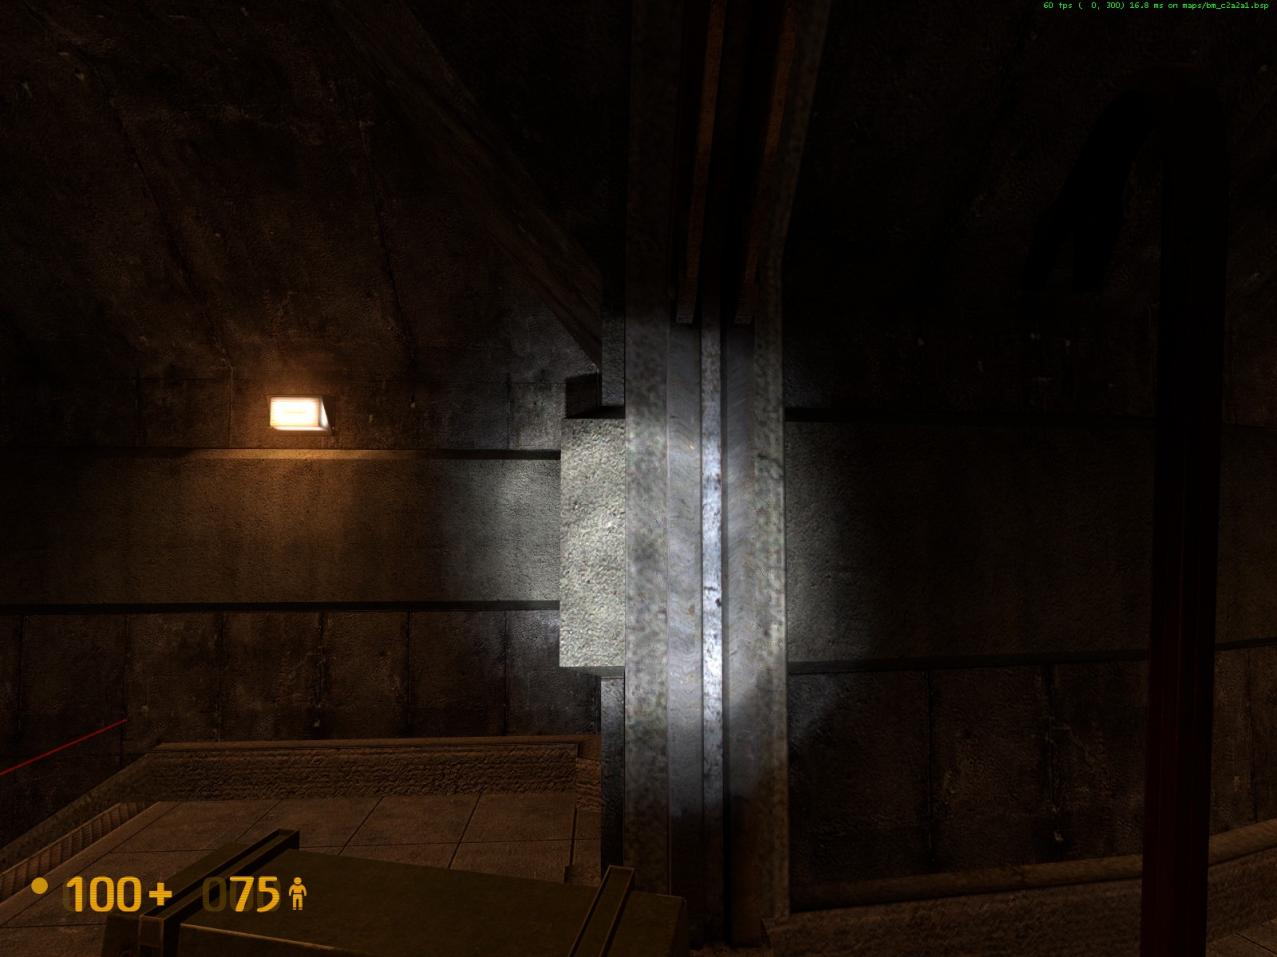
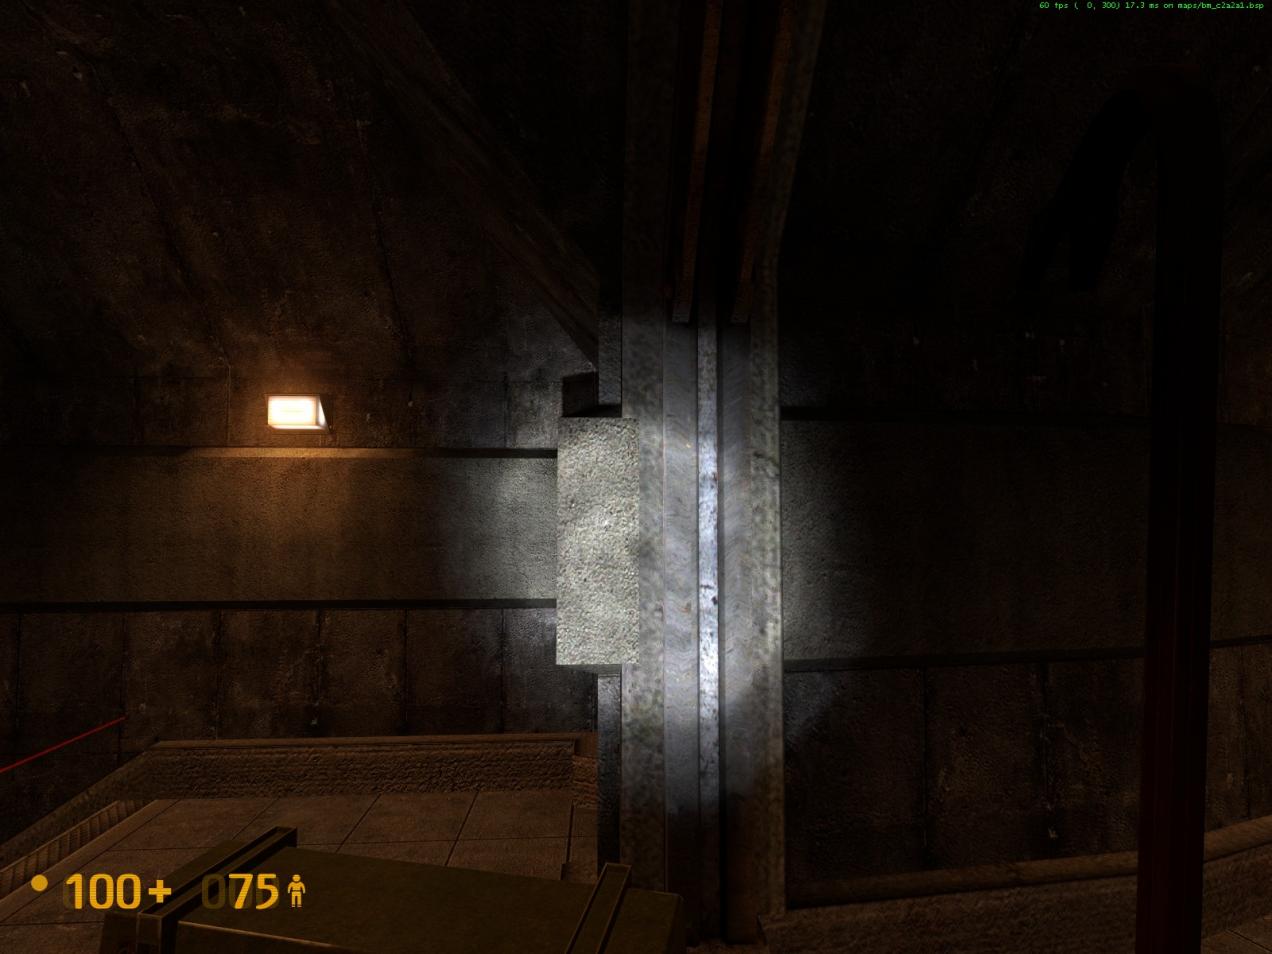
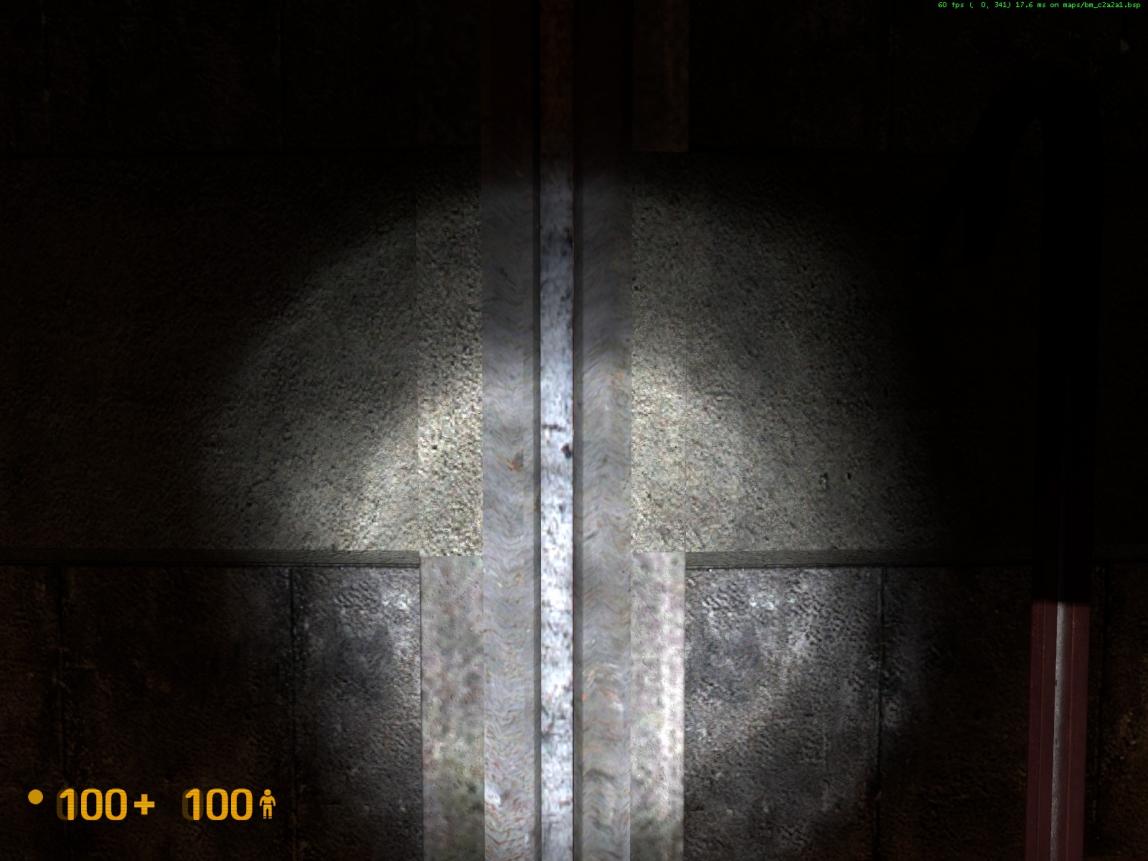
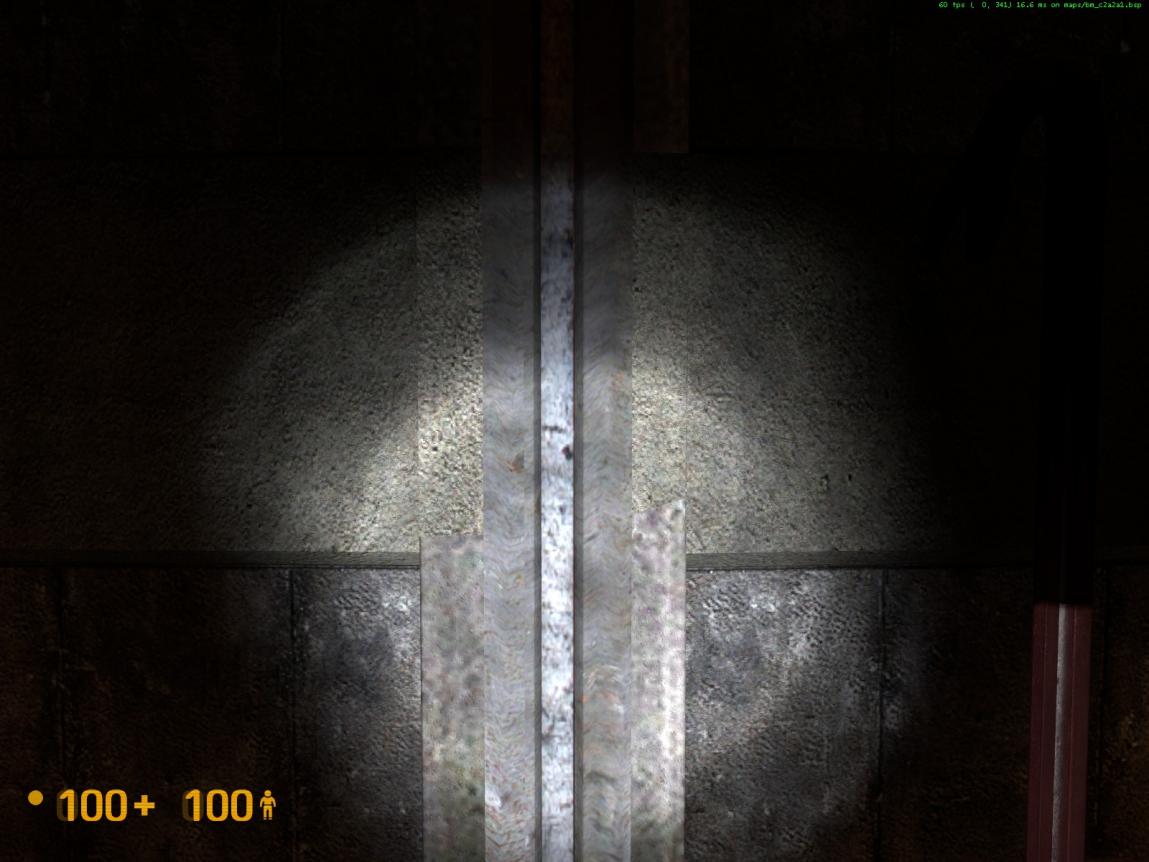
  21. These two tunnel support frames have texture z-fighting issues. See the attached pictures below.
    a) Pictures 1 and 2 pertain to the very first support frame at the start of c2a2a1. The problem also occurs on the opposite side.
    b) Pictures 3 and 4 refer to this one, a little further ahead https://i.imgur.com/EHpX534.jpg. This same support has an additional instance https://i.imgur.com/cQBIH69.jpg and https://i.imgur.com/EXOL68K.jpg. The one on the opposite wall is fine.
    c) I’ve checked all of the other tunnel support frames, on both maps, and they seem fine (Whew!).
  22. Just past the tram elevator HECU encampment, just up ahead past here https://i.imgur.com/uxh2FhB.jpg should there be a tunnel support frame here https://i.imgur.com/XgtSftm.jpg? Another incident is just past this area https://i.imgur.com/VXfnHz5.jpg here https://i.imgur.com/UX9dh42.jpg. Also here between the first and second wall mounted trip mines https://i.imgur.com/jzU9blU.jpg.
    What were you thinking??? The tunnels could come crashing down on our heads at any moment! I’m tellin’ the G-man.
  23. Made an observation in this area across these tracks https://i.imgur.com/601d2nw.jpg. The left side utilizes a raised vertical texture situated approximately at mid-wall height https://i.imgur.com/p3iihMU.jpg whereas the right side uses a flat texture https://i.imgur.com/93jq0JC.jpg. The left raised texture is used in the incoming tunnel https://i.imgur.com/Q4bbAay.jpg and seamlessly connects to the raised texture on this platform and around the corner into the far parallel tunnel https://i.imgur.com/xe3FhB9.jpg. The right side transitions between the raised texture and the flat texture, at tunnel support frames https://i.imgur.com/sq5YQrv.jpg upon entering either tunnel https://i.imgur.com/oOSBMO0.jpg. Here’s a look at both at the ceiling air duct https://i.imgur.com/D4KP5eI.jpg and https://i.imgur.com/evdDpkx.jpg. Thought it would be consistent and look better if the same design could be used, if possible, within the tunnel’s entrances/exits to this area and throughout this platform. Maybe there’s a design issue that doesn’t allow for it.
  24. On the elevated walkway area, above the tram elevator HECU encampment, there are three instances where the brackets on the top of the tunnel support frames can be partially seen. These brackets are missing their top texture, so you can see through them.
    Incident 1 https://i.imgur.com/ew77R64.jpg close-up https://i.imgur.com/R67s7Yy.jpg
    Incident 2 https://i.imgur.com/geuCesZ.jpg close-up https://i.imgur.com/Zq3K4bD.jpg
    Incident 3 https://i.imgur.com/678iZ22.jpg close-up https://i.imgur.com/XzvHqGW.jpg
    Incident 4, by the kitchen https://i.imgur.com/mLnXPKP.jpg close-up https://i.imgur.com/FKJTIsU.jpg
    Incident 5 https://i.imgur.com/mmnz7uE.jpg here https://i.imgur.com/3uY1L3O.jpg close-up https://i.imgur.com/pOSyY2S.jpg
    If possible, I suggest repositioning the tunnel support frames so that their top brackets are not exposed or visible from above.
  25. Concerning the elevated walkway, above the tram elevator HECU encampment, this area is well lit because all the lights are functioning. I suggest having this first fluorescent light flickering https://i.imgur.com/xB0fDad.jpg and the far one defective. This may provide a nice look from below. It will also partially cloak the headcrabs that are situated up here. Maybe place a body somewhere. The rest of the lighting motif, I leave up to you. For the four battery packs at the far end, place a couple on the accessible ledge, to the right of the walkway, like so https://i.imgur.com/cDufWRF.jpg. They can be seen, by observant players, from the tracks below https://i.imgur.com/RUG1EFn.jpg, so more players in need will be drawn up into this area. Also, consider placing a couple on the ledge in the corner next to the stairs. As you can see, they have a nice glow effect there https://i.imgur.com/gaTn26z.jpg
  26. Consider placing a light above the “Maintenance Storage” room door, to match the other doors https://i.imgur.com/ZR5eIsn.jpg
  27. In the office complex stairwells, all of the mounting rods for the fluorescent lights don’t appear to make contact with the ceiling. I suggest confirming that all fluorescent lights, regardless of location, are properly anchored.
  28. Consider placing a tunnel wall light here, to match the one on the opposite side https://i.imgur.com/qM1DFf4.jpg
  29. Consider aligning these two wall lights so that they are directly opposite each other https://i.imgur.com/VSqhZNm.jpg like almost all others are throughout the tunnels.
  30. This tunnel support beam https://i.imgur.com/LE6aMTx.jpg has a texture z-fighting issue at its base, only on the left side, as shown by the crosshair here https://i.imgur.com/Fbb0Zxb.jpg. The same applies to the next tunnel support beam to the left on the same side. It has the same problem, but on both sides https://i.imgur.com/uH3aOUz.jpg. Checking further, this issue, in varying degrees, seems to occur quite often in the sampling I took. Investigate it yourself and then decide what actions you want to take.
  31. The right vertical side of this I-beam is clipping into the wall https://i.imgur.com/3cHjXvy.jpg. Here’s the one from the opposite side https://i.imgur.com/lsNgfzU.jpg
  32. The red I-beam located here https://i.imgur.com/osC7Gq7.jpg has a texture z-fighting issue https://i.imgur.com/VoojD25.jpg and https://i.imgur.com/NP1ttMb.jpg
  33. In this area https://i.imgur.com/ws6cDhb.jpg there are both white I-beams and red I-beams used. For consistency, consider swapping out the white ones for red ones, as they seem more the appropriate color. Red types are used throughout the office complex areas and also outside the office across the tracks.
  34. Operationally speaking, consider placing a light above these control panels or shift them over in front of the window so that they are better lit https://i.imgur.com/MTHfe5m.jpg
  35. These papers seem to truncate abnormally along the right side https://i.imgur.com/5YPOG73.jpg
  36. Within the same office as #184, this pallet clips into numerous objects on the floor https://i.imgur.com/f5zwRaE.jpg. If a difficult fix, consider removing the pallet.
  37. Consider removing this equipment rack, as it seems out of place here https://i.imgur.com/Lhiwv12.jpg
  38. This I-beam should extend all the way up to the ceiling https://i.imgur.com/lh3fm8b.jpg to match the one on the opposite side https://i.imgur.com/wDi5zWe.jpg, even though there’s no texture seam to hide.
  39. Can a uniform ceiling texture be used here? https://i.imgur.com/OakApn0.jpg close-up https://i.imgur.com/CXWoDfg.jpg
  40. On occasion, a portion of a tunnel support frame is detached from the wall, through which the area behind can be seen:
    Incident 1 - at the electrified water blast doors https://i.imgur.com/TDTEMs1.jpg close-up https://i.imgur.com/TOdsMii.jpg
    Incident 2 - at the electrified water, the first tunnel support frame when walking away from the blast doors https://i.imgur.com/J0ujLf4.jpg close-up https://i.imgur.com/pTm2YdE.jpg
    Incident 3 - at the electrified water, the second tunnel support frame when walking away from the blast doors https://i.imgur.com/x40Ps2C.jpg close-up https://i.imgur.com/FLc6azA.jpg
    Incident 4 - at the last wall mounted trip mine https://i.imgur.com/ymReem4.jpg close-up https://i.imgur.com/qUeaBhI.jpg
    Incident 5 - at map start c2a2a1 https://i.imgur.com/WwHIJ27.jpg close-up https://i.imgur.com/ofKj0Oy.jpg
    Incident 6 - at map start c2a2a1, second support https://i.imgur.com/8zNJ1fd.jpg close-up https://i.imgur.com/HVafMjS.jpg
    I’ve found other occasions of this problem, which understandably only occurs on tunnel curves, and although there seems to be room to adjust the position of the tunnel support frame, it may be a case where in doing so fixes the issue on one side but then causes it to occur on the other. I suspect some may be fixable or can have the width of the gap reduced. I’ll leave this in your magical hands.
  41. This I-beam looks odd here as it doesn’t support anything. It seems its only possible purpose is to cover up a texture seam https://i.imgur.com/Hii6yLa.jpg and https://i.imgur.com/DsJsLcn.jpg. Can it somehow be set (clipped) into and made flush with the wall? If so, then these, and others, could be made to look much neater https://i.imgur.com/RchfsiE.jpg and https://i.imgur.com/a7DbdxF.jpg
  42. This bulletin board is floating in mid air https://i.imgur.com/p0xHaWj.jpg. Seems to be the case with all large bulletin boards.
  43. To make the larger wall less bare, consider placing the “MEN” sign on the right side of the door https://i.imgur.com/87LreCA.jpg
  44. Consider centering the “Rail Security Override” sign between the monitors, and slightly higher https://i.imgur.com/jx9w7ot.jpg
  45. In the “Rail Security Override” office, consider widening the gaps between the wall and the filing cabinet and between the desk and the door, to facilitate easier player movement https://i.imgur.com/30vsVMF.jpg
  46. Consider lowering the height of these wall postings, at the transit access stairs https://i.imgur.com/LOCnjJv.jpg
  47. These three pipes don’t look right here, being mounted on this section that juts out, since they don’t exit on either side. Continuity wise, they also don’t match any of the other pipes used in this area https://i.imgur.com/5no64wZ.jpg. Consider running them vertically up into the ceiling.
  48. Consider removing two of the three central vertical supports, as there are too many of them https://i.imgur.com/SFmdfAz.jpg. This will allow for a better view of the details in behind them and also make the area less claustrophobic.
  49. Consider placing a bracket, like the one in the foreground, where these wires enter the wall https://i.imgur.com/zZIAe12.jpg. Or have them enter into an electrical box.
  50. The following lights are floating in mid air:
    a) The first light in the tunnel section leading to the electrified water https://i.imgur.com/w4bfO62.jpg
    b) This light here https://i.imgur.com/pTB9ITs.jpg
    c) This light here https://i.imgur.com/7kb96MS.jpg
    d) This light here https://i.imgur.com/noS38Ri.jpg
    e) This light here https://i.imgur.com/o4f9UEv.jpg
    f) These two, just before the tram elevator HECU encampment https://i.imgur.com/ImhDCq9.jpg and https://i.imgur.com/O0J4xJd.jpg
    g) These two, leading into the crane and rail control area https://i.imgur.com/RDEiBZk.jpg and https://i.imgur.com/Jr1PoNp.jpg
    h) This one, leading into the area with the lower water section https://i.imgur.com/VSK5vgW.jpg
    i) This light, adjacent to the kitchen https://i.imgur.com/d6H9Ztk.jpg
    j) This light https://i.imgur.com/oxncUPi.jpg found here https://i.imgur.com/2VpQJ2o.jpg
    k) And this light, just past the blast door beyond the electrified water https://i.imgur.com/5dxGvt1.jpg (backward looking perspective)

To be continued…
.
.


Figured I’d post a progress report as I’ve been very quiet the past few days. Had a bit of a crazy weekend and uni’s ramped up a lot, so apologies if I can’t post updates quite as often.

Progress on the B maps has been VERY SLOW, due to a number of reasons which I won’t go into. I’ve been finding it very hard to be inspired by the B maps whereas with the A maps the mapping just flowed very naturally to me. Call it a “creative block” if you will. I’m finding it very tricky to find the balance between the HL1 layout/aesthetic style and my own idea of how things should look and play. I’ve already ditched several layouts, designs and aesthetics and tried again, but finding the balance is tricky, particularly when this section in HL1 was fairly underdeveloped. I’m getting there though, I actually got a decent amount of work done today and am still going.

On the subject of the F map, I’ve pretty much decided to set the majority of the map outside, which is certainly going to be a very tricky card to play - but I’ll cross that bridge when I come to it. I’ve blocked out most of the very basic layout for the E map’s remake and am in the process of detailing it up and developing it.

I’ll write a more detailed post later replying to some things forum users have said, but for now this’ll have to do. Cheers guys - just letting you know I’m still at work on this! Expect to see results in 2 - 3 weeks, I’d guess.

Hell yeah some nightime outdoor areas. This is great. That would be great if you also add sniper outside and zombies covered when you use health charger. I know I asked for it many times but I just can’t stop :stuck_out_tongue: I’m so excited of your progress and alpha version of A maps was awesome. Can’t wait for beta. And what about a hecu soldier using dynamites, how will you implement that (if you do) ? Will we be able to see some hecu vs. heacrabs fight maybe ?

We weren’t questioning your dedication. Still things crop up, and I suspect they still persist, but no need going into that. Why not let us help you brain storm? We are here for that you know. :stuck_out_tongue:

If we had some feeling on what you wanted to go for (and what you have right now) we could put something together that you may like.

About setting the maps outdoors, do you intend on having any Trainyards like Blue Shift did? That’d be pretty cool. You could probably make Trains by using HL2’s train wheel frame thingy and brushing out the rest. Box cars aren’t that complex, even less complex if you just go the way of making a reletively flat platform and putting shipping containers ontop.

Take your time Text. None of us expect you to match the breakneck speed in development you had with ST Uncut. As you’ve clearly stated, things are different now, and we all fully understand that. So pace yourself and do the work in measured segments, interspersed with relaxed downtime. But most importantly, keep your priorities straight. OaR Uncut will keep. However long it takes for the next release, we’ll be patiently waiting and rooting you on, the whole way through.

This creative block stuff was what I expected all through ST Uncut and the beginning of this anyway, but you’ve been zooming through your work with amazing results, so something like this isn’t even a thought. Take your time.

This seems fair enough. Later this evening I’ll post some schematics and WiP shots (note: VERY WIP shots, as in they’ll be from Hammer and are still extraordinarily unfinished), detailing some of the problems I’ve been having, so the community can help me brainstorm some solutions. It’ll also let the community see how it’s been shaping up and all that jazz.

I’ve actually done quite a good amount of work on the missing section from HL’s D map, and expanded on it quite a bit. It’s starting to shape up nicely, even if it’s only a small segment. It’s the E and the F map which are the problem children, which I’ll talk about tonight when I make a big post.

^ Sounds good.

Alright, here are the images which are all annotated. Hopefully it gives everyone an idea of what’s happened so far and some of the problems I’m facing. I’m open to suggestions, comments and ideas. Bear in mind this is seriously work in progress, I haven’t even got any of it in game yet, it’s all still in the editor.

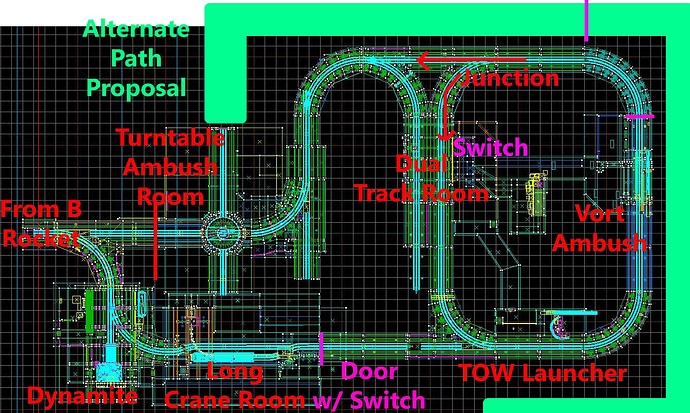
Label Key:
[COLOR=‘Magenta’]Purple = Switchable Door/Gate
[COLOR=‘Red’]Red = No access


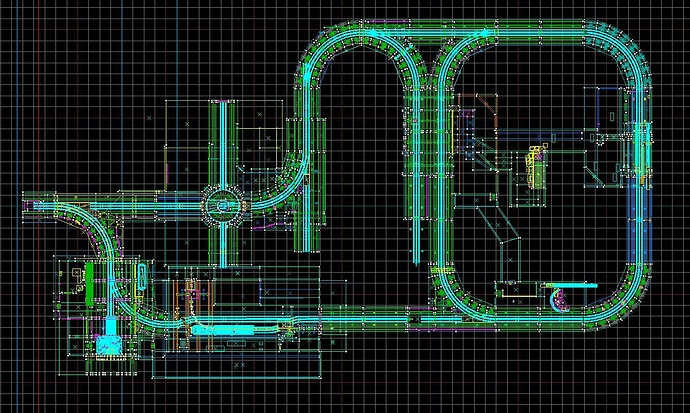
Unlabelled overhead schematic for B1


Labelled overhead schematic for B1

My current design issue with this layout for B1 is twofold. While I was extremely happy with the way the layout turned out in terms of the way the loops behave and how it slots in with the B/C layout, there are two major problems which I haven’t overcome as of yet.

The first would be how to implement the commandeer-able tram. It was a pretty neat and memorable part of the E map so I would certainly like to keep it if possible. If you look at the dual track room, you can see what my initial intentions were when designing that area. The track (which currently leads to nowhere) would have the enemy tram come out of it and follow you along, and no matter what you did (commandeer the enemy tram or stick to your own), you would end up in the turntable ambush room. This design worked nicely initially until I ended up needing to rotate and move the loop to overcome a space overlap with B/C’s current design. If you look at how it works now - you approach from the door w/ switch, and enter the loop from that direction. The problem is that now - if I make the enemy tram originate from the track to nowhere - it’ll be going in the opposite direction to you, which changes things up from HL1 a fair bit, where it went alongside you instead.

I have 2 potential ways of solving this and I’m kind of torn between them.

  1. My initial design involved the player NOT BEING ABLE to get stuck on the main loop. If you look at the top where the half-loop joins with the main loop, you’ll see the switchable junction connecting them together. My current design makes it so that the tram, after passing the Vort ambush, passes through that connector junction and goes straight towards the turntable ambush room, rather than going in circles on the loop by default. This would mean you’d miss the commandeer-able tram entirely, by default, which I don’t want. One potential way of addressing the design would be to have the junction set to loop by default, meaning as the player approaches the dual track room on tram, the enemy train comes out from the track to nowhere TOWARDS them. The player would then have the choice of jumping onto the oncoming tram, or carrying round in the circle and switching the junction later. This is a decent, but not perfect solution, in my mind.

  2. Create an alternate path which is essentially an accessible, parallel track. The pathway is marked in green on the labelled diagram. The enemy tram would travel along here from the pink gate, alongside you. If you commandeer it, you gain an alternate entrance to the turntable ambush room which I will make fairly advantageous in some way, shape or form compared to if you’d stayed on your own tram - which can be decided later. This has the advantage of being more HL1 like and making it so the player isn’t stuck on the loop by default (which could be a good or a bad thing depending on how you look at it). It has a few disadvantages though. Firstly it renders the path to nowhere which I was planning on using kinda pointless aside from looking functionally cool. One thing I’d like to do if I implemented this suggestion was find something cool or fun to do with that empty track. I’d hate to have it just sitting there, doing nothing, particularly because I think the design of that junction is really cool and intuitive. The other disadvantage is the entrance which the alternate path uses (which is really the only one it CAN use) will be sitting in the place where the elevator to the top level was originally planned to be. Where the alternate path joins the turntable room is where I was originally going to put the elevator to the next map - it’s the best place for it.

I’d need to find a new home for the turntable elevator, and there’s a serious space issue here, as you can see. There are very few places I can put it where it doesn’t overlap with existing parts of the map, and I’m loathe to move the turntable room itself as it’s in a really cool place currently - connected to 2 earlier parts of the map (though inaccessible from both of them, the attentive would probably notice the connection). It gives the map an overall great sense of cohesion and orientation, I think. So, if I were to implement this path - where would the elevator go? Most likely I’d have to merge it with the turntable in the center of the room which I’m still not sure I’d want to do.

What to do guys? Which of these suggestions is king? Do you have any alternative suggestions/ideas? Any alterations to my own that can make it better? Let me know, I’d be really happy to hear!

In quite a few places on these next shots I’ve expanded a fair bit on the HL1 versions. I hope to carry on this legacy into the rest of the B maps.


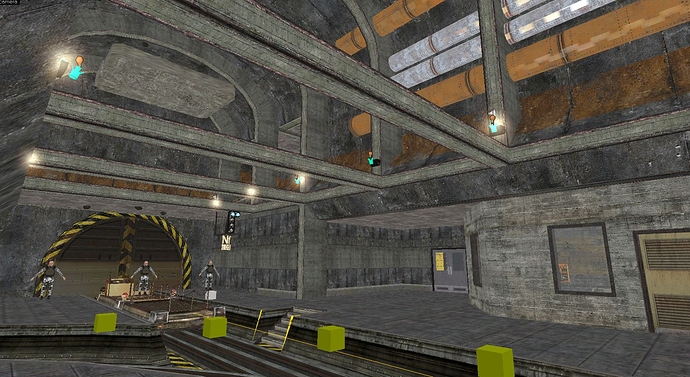
Dynamite room (just after B rocket, replaces the elevator to C). You can see the satchels on the bridge above the HECU Marines, and on the ceiling above that (where the weird floating block of concrete is). As you enter this room, the large doors will be closing, the HECU will run towards the security office (with the HEV Charger in it), and detonate the Satchels, dropping debris all over the main doors and blocking it off. The large doors will be marked “Launch Pad Access,” or something along those lines.


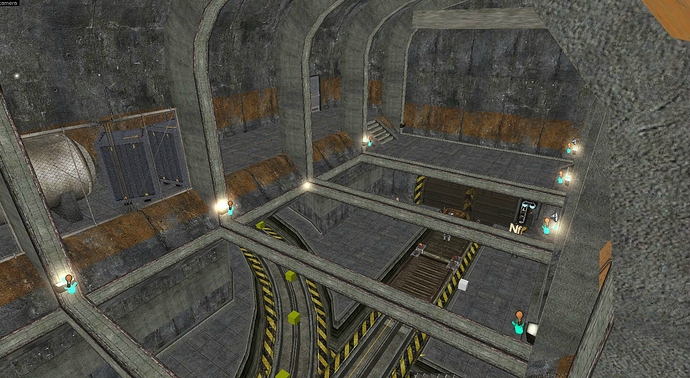
Alternate view. After detonation the player will either be able to take the train down the left fork, or climb up the debris by the launch pad doors to access the upper level. Both paths lead into the next room.


Long crane room. If the player takes the train, they’ll go down the straight tracks. They can also get off the train and walk along the footpaths, obviously. If the player climbed on the debris in the dynamite room, they’ll enter the room from an advantageous high position, on a high walkway by the orange markings. I haven’t fleshed out the walkway just yet but will do so in due course.

To open the “Secure Access” door (which leads to the Mat Trans, newer section of the system, and will later be labelled more appropriately) the player must open the doors from the security office, by the turrets. There will be 2 HECU inside, killed by a Bullsquid.

Overhead (you can see the silver door) there will be crates being transported automatically along the tracks like the ones you see on HL1’s F map. The crates come in from the turntable room, and go out towards the B1 tracks.


Alternate view, long crane room.


Vort ambush area. Not particularly developed yet, as you can see.


Dual track room. Pretty much the same as HL1’s version, but with more of a focus on the “Mat Trans” aspect. The switch to unlock the toll gates will be by the security station by the HEV charger. The left wall underneath the green crates on ground level will probably be opened up to serve as some kind of loading dock.


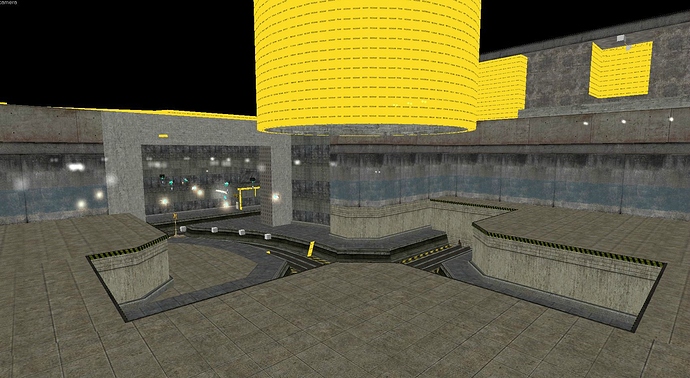
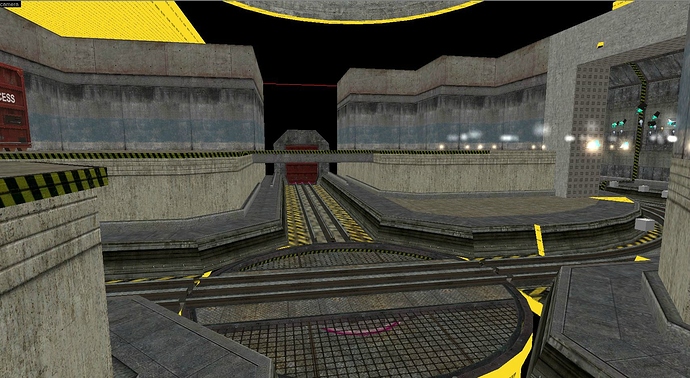
Turntable room current design - viewed from inside the room. The large cylindrical silo like structure in the center will either for the turntable elevator if I decide to merge it with the turntable, or it will be some kind of skylight/vertical space down which some HECU will rappel later in the battle. The red door on the tracks was where I planned to put the elevator. The player would approach from the right - they’d need to move onto the turntable and rotate it 90 degrees to advance.


Turntable room alternate view.

That’s it so far. Any thoughts/suggestions/comments on absolutely anything you’ve seen here are welcome. I’ll respond to things people have said before this post a bit later.

Go with a combo of option A & B.

For A be sure to add in a ladder-type access for the player to swap the track controls quickly after opening the gates. Take a look at BM_C2A5F’s Alleyway after going out the armory for an example.

For B Do you have enough room to make a 45-degree slant like seen in the beginning of BM_C2A2A raising the tunnel(s) (provided it’s easy)? And merging this additional path with the long crane room?

Basically the idea is: Raise entirety of the section after the long crane room by a number of units with having a slope in the tunnel to justify going up, raise the ceiling of the long crane room by the same number of units, and add a usable crane the player can use to transfer the tram from one track to another if you have the asset for it. I have no idea if it’s doable though.

BUT, that’s all contingent on if you have enough room for it.

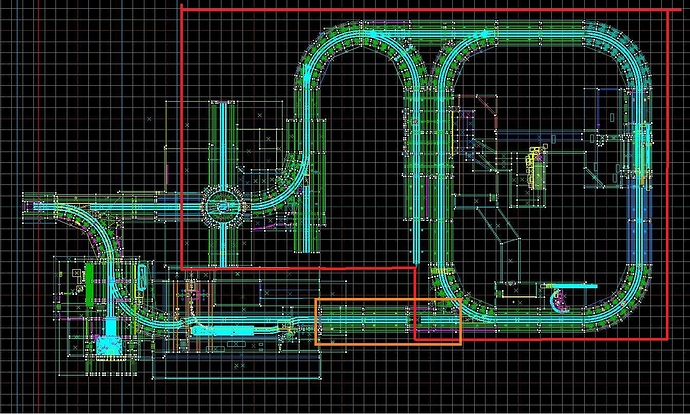
Basically, with the shitty MS paint I did, the red’s where it needs to be raised (excluding the crane room clip), the orange is the slope.

Another viable option is to have the alternate path snake under or over the main one, keeping the paths separate, and have it end up in the turntable room (that should be raised a number of units to clear the long crane room) via the opposite side you were proposing for the tunnel initially.

Edit #2: The alternate path I’m referring to is the dual tunnels, they don’t reconnect till the turntable room if this method is gone with. It’s a semi-oval that snakes to the end I referred to above.

I say go with A for a few reasons.

  • The elevator: Basically right now you have two options for where to put the elevator. You could put it at the northern tip of the cross as intended, or you can make the turntable the elevator. The problem is if you go with B, you are forced into make the turntable the elevator. East is entrance, north is entrance, west goes back to B, and there isn’t room for anything south, since it would run into the crane room. Keeping it as A would let you have both of these options.

  • Repeat of scene: Yes, I agree that this part was pretty neat in the original HL, but we also have a tram going alongside us in C (even though we cannot reach it). Being faced with this same scenario twice (even though yours will come chronologically first) will make it stale. Commandeering an opposing tram seems like a nice thing to do, and I say there’s nothing wrong with introducing a very small variation.

  • Turntable problems: The major problem with this approach is that you have two separate entrances for the turntable room, which also means that you also have to have two starting states for the turntable to accommodate this. Assuming that you have to also make it into an elevator, that might also potentially mean you have to make two separate lifting configurations for when it does move up. Having a single track coming in gets rid of this issue.

  • Missed opportunities: Granted most people that have played Half-Life will know to try and jump on the tram, but what if they don’t? I know when I played the original I defeated the marines on the tram but didn’t do anything other than that. Because it was the only tram that went onwards, if you missed that opportunity somehow then you were forced to walk the length of the track to catch up to it. Maybe I was being a retarded HL player, but hey, I call curiosity to explore.

Huh, I can see why you would be stuck on that. I’ve been trying to work on a good solution for an hour with 3 other track designs, and they’re all flawed in some way, being overly complex and allowing the player to skip them completely by simply stealing the soldier’s tram or miss the soldier tram completely. However this is the best one I’ve come up with thus far, it’s not an amazing design but it’s decent:

[code]KEY:
Red Line: Unused / unusable track piece.
A: Toll Switch must be activated to pass.
B: Soldier Tram, enabled once the player passes C, becomes active once the player nears B.
C: Starts Right but switches to Straight once the player encounters the Soldier Tram.
D: This track goes down one floor to pass under the wye.
E: Track raises back up to be level with the rest.

This design was made to minimilise the risk of getting lost as long as the Player has a
Tram. It’s also much simpler and compact than the other designs I attempted.[/code]

If anything’s unclear, just ask me, I’ll elaborate further.

I say go with Chickenprotector’s idea.

Founded in 2004, Leakfree.org became one of the first online communities dedicated to Valve’s Source engine development. It is more famously known for the formation of Black Mesa: Source under the 'Leakfree Modification Team' handle in September 2004.